Adding depth to a mix quite literally brings a new dimension to your virtual space. Here are nine things to keep in mind when you go ‘behind the music’.
Mixing music is all about putting everything in its virtual place. Mixing advice usually comes in terms of frequency ranges and panning – how high and how wide it is. These are things that are easy to see and describe from the comfort of a DAW. But what isn’t talked about so much is the elusive third dimension: depth.
Technically, one very quick way to create a sense of depth in a mix is to add a reverb into the equation. Given that reverb models entire spaces, simulating the movement and reflection of sound throughout a space, a sense of depth is almost inevitable. But we’ll give you some Dos and Don’ts of reverb programming to make the effect more realistic.
In this article, we’ll use some acoustic principles, some psychoacoustic knowledge, and some real-world experience to give you a foundation for how to approach depth in a mixing project.
If two sounds are exactly the same, but one is placed further away from us, it will be quieter than the closer sound. We know this intuitively, and we know this acoustically with the inverse square law. It’s very easy to simulate the property of distance while mixing using a gain control.
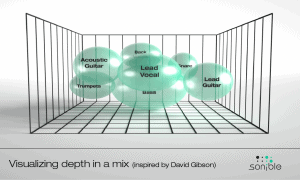
In decades of moving faders to find the perfect mix, perhaps what we’ve always been aiming for is a sense of relative depth for each channel.
If all the elements of a mix are right upfront in the listener’s face, that’s not depth. At the same time, if all those elements are placed as far back as they possibly can be in the virtual space, that’s not depth either.
A good sense of depth in a mix comes from representing a variety of positions. You may have a vocal very up-close, a piano midway back, and backing elements placed far away – or anything anywhere in between.
There’s one thing to note here: we can technically think of the reverb signal itself as its own element. Since a reverb response reaches all corners and depths in a room, it manages to represent the deepest depths. With an appropriate reverb signal, no instruments need to go right to the back of the space.
Along with level, high frequencies are a key indicator of how far away something is.
A simple way of ’moving’ something further away in a mix is to reduce the level of a high-shelf filter. Bringing something more upfront can be simulated by increasing the level of that filter. This is in addition to manipulating its overall volume level as in Rule 1.
The reason for this is that higher frequencies are more likely to be attenuated by the air itself. As a sound moves further away, it has more air to traverse, and there’s more high-frequency loss.
High frequencies tend to be more directional, too. If you’re staring down the barrel of a trombone, its higher frequencies will be loud and clear; walk off-axis, and those higher frequencies tend to reduce, relatively speaking. This may not matter to individual recorded channels, but one crucial time to think about this is when adding reverb.
If you want to place an element further away, its reverb signal – fed from the non-direct sound – should have even less high-frequency energy than the direct sound. If using a reverb bus for multiple elements, reducing the highest frequencies of an element on the send or bus before it hits the reverb is a great way to portray depth accurately in a mix. Not all DAWs give you the option to do this, though.
Why was the de-esser conceived? Because the microphone was invented.
As we’ve just covered, high frequencies tend to get absorbed by the air between a source and a listener. When that ‘listener’ is a microphone, the source (a vocalist) is usually placed so close that there’s barely any time to lose any high frequencies. The sound, therefore, is overly sibilant, too mouthy, and generally not a great representation of a voice as we usually hear them.
Note that, elsewhere when we talk about ‘The Proximity Effect’ in microphones, that’s not exactly what we’re talking about here, although it does still apply. The proximity effect of a cardioid microphone’s bass response being exaggerated when a source is too close.

When played back, a signal recorded by a microphone is represented as how that signal sounds right next to your ear – but all the time. The same applies to any instrument that has been close-miked (spot-miked). This is no good if your mission is to have a varied and nuanced sense of depth to your mix.
So reverb is key to creating a sense of depth, but beyond adding one and hoping for the best, there are some rules of thumb for achieving that front-to-back realism.
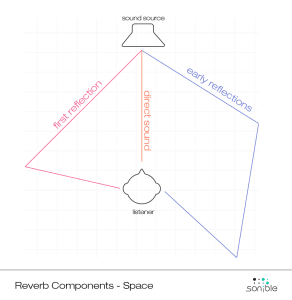
Many reverb processors are split in their treatment of early and late reflections, and it’s important to remember what each contributes to the sound in terms of width. For more on early and late reflections, you can read our article on Reverb Components and Considerations.
Early reflections are used by our brains to gather positional information, and this can include a sense of distance based on how long they take to arrive. Late reflections are used as information on the space in general, with size, construction and shape expressed nicely in late reflection build-ups.
If different mix elements are to be located in the same virtual space, late reflections may have a similar profile, but take note of the early reflection properties of different reverbs if you want to place elements for a good spread of depth.
 Rule 6: The Pre-Delay dilemma
Pre-Delay lets you add a gap between your initial sound and the start of the reverb response to it. The trouble is, not everyone can quite agree on what Pre-Delay is actually for.
Ask a music producer who’s used to working with studio recordings, DI-ed guitar signals and takes from the vocal booth, and they’ll tell you that Pre-Delay makes something sound closer to the listener. But ask an orchestral mixing engineer, and they will tell you that Pre-Delay makes something sound further away. How can this be?
Both perspectives can be right. introducing Pre-Delay seems to make things feel closer in a smaller room, but further away in a bigger room.

In a smaller space, Pre-Delay will create a gap before early reflections rush in, giving time to hear the sound before you hear the space. This is usually said to create a sense of intimacy, leaving the sound uncrowded.
Imagine a larger room. It contains larger reflections that take a while to arrive at the listener – its reverb time is naturally long. Sound from a source at the back of this room will also take longer to hit the listener, but so will the early and late reflections. In this environment, Pre-Delay emphasizes the effect, and emphasizes the sense of space felt, pushing the source further back, or so we perceive it.
In addition to depth, width is a key element of creating your ‘virtual sound stage’. We’re not going far into width here, but it’s worth considering how width interacts with depth.
Width can be very narrow for a mono source panned to a specific location. This narrowness will usually not help if you’re hoping to make a source sound like it’s close to the listener, because every close sound is wide compared to the gap between our ears. A narrow sound can convey depth, however, just as we can point to a single instrumentalist in an orchestra.
Reverb is almost always wide in the real world, so these considerations of width apply mostly to direct source sounds only.
High frequencies change reliably with distance, but lows can behave more strangely.
Low frequencies are less likely to be lost to the air itself, can be boosted or attenuated by the dimensions of the room itself, and can conduct easily through solids (ie, walls), helping them to stay strong as they peel further away. This is why when standing outside a nightclub, all you can usually hear is the very lowest frequencies of the music.
So how should you treat low frequencies with depth? There’s no perfect rule, but you can rest assured that boosting the lows is a safe practice for a far-away sound. Attenuating them may be good for mixing, but possibly not for realism.
Psychoacoustically, you can hear more of a sound’s tinier details when it’s closer to you. We can use compression to emulate that.
Image a car passing you by. When it’s approaching, you can hear the engine, but as it approaches, you start to hear more: the scrape of the tires, the finer point of the engine ticking, even the radio inside the car.
For a more musical example, imagine a picked acoustic guitar. When it’s close to you, the sound of the pick scraping will be far more apparent than when the instrument is played further away from you. While mixing, if this element has been recorded with a close microphone, these details may well be apparent even as you try to place it further back in the virtual space..
On the other hand, compression can be used to bring the lesser-heard features of a sound. We often use compression to ‘bring out’ the detail in an instrument, but we don’t necessarily think of this as a process of making it sound closer to the listener.