On the journey of a song from idea to airplay, there is one stop along the way that is perhaps more shrouded in mystery than all the others. Many are aware of the process of mastering a track; music from decades ago is often “remastered” to modern standards and labelled as such, but what’s actually involved in this darkest of arts? This article aims to unwrap the enigma that is mastering music, from what it is to what it does, and how to do it.
Mastering is the concluding stage of the music production process, and it serves a number of purposes in taking music from the mixing stage, and giving it a final polish before it goes out to the world.

There’s a common misconception that mastering is just about getting music to a certain loudness without impacting its dynamics. While loudness is often one goal of the process, there’s much more to it than that.
Even after a track has been mixed, it may still need some finishing touches from another set of ears in order to ensure it not only holds up against other tracks from the EP or album, but against other records too. When mastering for an EP or album, the tracks should all be consistent with regards to their level and dynamics.
As well as loudness, a track’s overall tone and balance are factors that mastering engineers will look to adjust if necessary. Although these components are subjective, there are a number of considerations to be taken into account when making tonal alterations. The genre of music will play into how the track should sound, for example a pop song that is expected to get a lot of radio airtime may be mastered to sound brighter than a song produced strictly for a club environment, which may contain more sub bass.
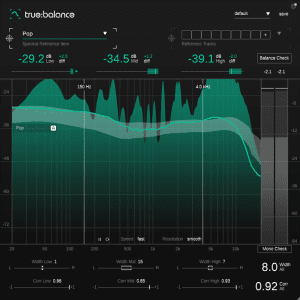
true:balance with pop profil
Here lies another role of a mastering engineer; tracks should sound as good as they can across all playback systems, from bluetooth speakers to huge festival rigs.
Mastering engineers will also examine the stereo field and mono compatibility of tracks, making sure that sub frequencies are all in mono and there is no unwanted phasing occurring anywhere across the frequency spectrum. They may also apply stereo enhancements to certain frequencies if necessary, to give the final product a wider sound.
The release format of the music also has some bearing on how tracks are mastered, for example there are different loudness standards for Spotify as there are for vinyl, CD or a film score. In some instances, a mastering engineer will be required to supply a number of masters, each meeting different loudness levels and file formats.
You may have seen pictures of mastering studios with mountains of gear, and historically, outboard hardware would have been necessary to master an album. Thankfully, modern day mastering requires little more than a computer, a DAW and some knowledge of the procedure. Advancements in technology have made mastering accessible to the masses.
Having said that, there are some things that will make you a more confident and effective mastering engineer.

Arguably, a solid set of studio monitors are up there as some of the most valuable assets to any mixing or mastering engineer, but the benefit of having a well treated and acoustically balanced room cannot be overstated.
A badly set up room will prevent you from making accurate mastering decisions, hence the common belief that a good room is more important than the speakers themselves. A decent set of headphones are always a plus, but ultimately it’s important to have a good monitoring environment.
Realistically, though, most of us don’t have the space or budget to cover our walls in rockwool and foam, but there are plugins on the market that may act as a sense-checking service and could help to give you some confidence in your master. sonible true:level and true:balance metering plugins let you analyse your track against a rough rule of thumb for that style of music, or even against a number of your chosen reference tracks that have the sound you’re aiming for.

true:level with two reference tracks
As with most facets of music production, there is no hard and fast rule of mastering that will magically turn any song into a sonic masterpiece, because that would be too easy! Instead, there are any number of mastering setups and configurations that combine a range of tools and techniques.
You can, though, follow a rough rule of thumb to get you started, and adjust your mastering approach according to the needs of the audio. Here, we’ll outline a suggested mastering method from start to finish, but as above this is by no means the final word on the process.
As with mixing tracks, regularly listening to a range of reference tracks is a reliable way to make sure you’re setting off on your mastering journey in the right direction, and also ‘resetting’ your ears. Bring a few tracks that reflect how you want your finished product to sound into your DAW, ideally these should be tracks you know and have listened to on a range of playback systems.
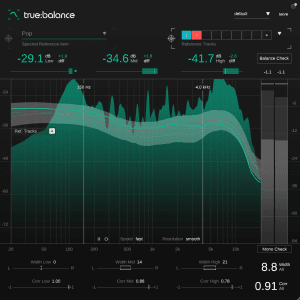
true:balance with two reference tracks
Using your ears is the most important thing here, but metering plugins such as true:balance and true:level give you a visual representation of your audio’s balance and level. The handy referencing functionality found in sonible true:level and true:balance lets you compare up to eight tracks, all within a single instance of the plugin.
Within the context of mastering, EQ can serve a number of purposes. Often, the first thing in a mastering chain is a parametric EQ, useful for removing unwanted resonant frequencies and cutting unnecessary low end, around 30Hz and below. Then, a more tonal EQ may be used to gently shape the overall balance of the master, adding warmth and character in the process.
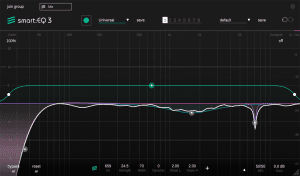
smart:EQ 3 with various filters
(Note: We replaced smart:EQ 3 with smart:EQ 4)
You may want to EQ before you compress, so that the compressor is only responding to the audio that will actually be heard in the final master. Be warned though, that if you want to make EQ changes after you’ve dialled in your compression, you may need to rejig your compressor configuration.
While the pre-master may have some compression already applied, you might need to apply further dynamics processing to help the track to sound like one cohesive entity. The goal here is partly to glue the mix together, but also to control any stray peaks. A glue compressor is an ideal tool for the former, and a more tonal compressor for the latter. At this stage, you should only be applying relatively gentle processing, with a gain reduction of around 1dB to 3dB, otherwise there’s a problem with the mixdown that needs addressing.
This step may not be necessary if you’ve already added a lot of tone and character with colourful EQ and compression processing, but some gentle saturation can really help to bring life and excitement to a dull or flat mix. Saturation can also help to further glue the track together after the compression stage. Try a few saturation types and models to see what works best with your track, but remember that it should only add very gentle saturation and the aim isn’t to distort your master.
The compression and saturation you’ve applied by this point will have gone some way to managing the dynamics of your track, but a limiter will help you to apply that final squeeze and add those last few decibels if necessary.
Again, if you’re having to apply a lot of gain reduction here, then go back to the compression stage, or perhaps even the mixing stage. A good rule of thumb for limiting is to increase the gain reduction until you hear audible distortion, then back things off by one or two decibels.
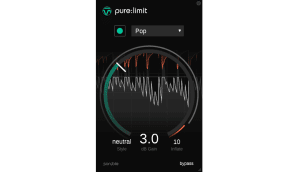
pure:limit with gain reduction
But how loud should your master be? A level metering plugin such as true:level will tell you your track’s loudness, dynamics and peak levels, and what you should be aiming for. While there is no one golden standard for all purposes, there are over 20 loudness references to choose from, so you can be sure to get the correct loudness for your tracks’ destination.
As before, this is just one approach to mastering and a summary of just some of the common tools that are employed by mastering engineers. There are other processing techniques on hand though should you need them, including multiband compressors, clippers and stereo enhancers, to name a few.
If you’ve gone through the above steps, carefully making minor refinements to the dynamics, balance and loudness of your track while regularly checking your progress against reference tracks, you should be getting somewhere.
As well as referencing different tracks, it’s good to listen to your processing on a variety of playback systems while A/Bing the processing you’re applying. Earplugs, laptop speakers and car sound systems are all useful points of reference, as this is likely where you and your end listener consume the most music.

Each track being mastered should of course sound great on its own, but it’s also important to listen to each track on a release in order to get a feel for how the tracks flow between one another. If one track is well levelled and balanced, then the next is too quiet and lacking high end information, it’s going to stick out like a sore thumb.