You know how to EQ, you know how to add reverb… but have you learnt how to combine these two processors effectively?
Note: We replaced smart:EQ 3 with smart:EQ 4 and smart:reverb with the next generation smart:reverb 2.
When working on a DAW project, most channels will benefit from equalization of some kind, and reverb channels are no different. Sure, reverb units sound amazing on their own, but they will often need some tweaking to actually sit well in a mix without unwanted masking.
But how should you EQ your reverb? It’s not quite the same as equalizing a traditional instrument track. For example, whether you place an EQ before or after a reverb will have a different implication for how your processing will sound. We’ll cover that and more in this article, as well as taking you through a few classic reverb EQing techniques using smart:reverb and smart:EQ 3. For all of these tips we will be using a reverb on a dedicated reverb send channel.
In this article:
There’s a decision to make about whether to place your EQ before or after a reverb in the signal path. There are conventions for this, and arguments for both, but your decision should be made on a case-by-case basis.
By filtering, cutting and boosting frequencies before a reverb, we can limit the production of undesirable frequencies in our reverb signal. This makes reverb plugins with built-in pre-filtering, such as smart:reverb, an ideal option for shaping the tone of the incoming ‘verb signal.
For example, the pre-filter EQ could be used to high pass filter the low frequencies of a sound, which would help to remove potential muddiness and keep the reverb sounding crystal clear.
smart:reverb Pre-filter EQ in detail
However, there are cases where alternatively, or in addition, you will want to place an EQ after your reverb. This is mostly for tonal shaping to get your reverb sound sitting in your mix just right. Perhaps you need a little boost at exactly 3kHz, or a cut in the low mids.
Reverb on a mix’s very lowest frequencies is generally thought to be a bad thing. If you consider the arrangement of music in almost any genre, you will notice that there tends to be only one bass element – be it a synth, bass guitar or double bass – playing at any one time. This is because bass frequencies more readily mask each other than mid and high frequencies do. This is why you can have guitars and keyboards playing at the same time in a mix but you never hear a bass guitar duet.
When you add reverb to a bass element, you are layering more bass frequencies into your mix which results in them masking one another and making the bass portion of your mix less clear and distinct.
In smart:reverb it is very easy to filter out these bass frequencies in order to avoid this issue. Start by loading the plugin on any channel that contains bass frequencies, whether it’s your master, drums, or bass guitar.
Select the appropriate profile from the dropdown menu in the top left hand corner of the UI, play your track and press the record button. smart:reverb will now listen to your track and apply an appropriate reverb.
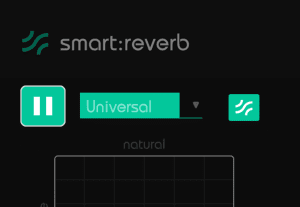
smart:reverb with the Universal learning profile in detail
The pre-filter can be found by clicking on the arrow in the bottom right hand corner of the UI. This will fold up a two band EQ.
As you can see, by default a 100Hz high pass filter was applied, so already sub frequencies have been removed from the signal. If desired we can roll this filter up the frequency spectrum further to remove even more bass frequencies.
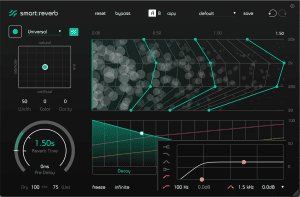 smart:reverb Pre-filter EQ with high pass filter
We’ve just discussed why you may want to, and how to, deal with unwanted reverb frequencies at the bottom end of the spectrum. However, higher frequencies at the opposite end can also be a problem.
Often when reverb is applied to instruments in the higher end of the frequency spectrum the effect can be quite harsh. This is particularly noticeable on percussive sounds such as hi hats and cymbals, but can also be unpleasant on vocals and strings.
When working with these kinds of sounds it is often desirable to tame the higher frequencies with either a high cut, or a high shelf.
We can do this either with an EQ either before or after the reverb. With smart:reverb’s built in EQ it’s very easy; simply open up the in-built EQ, select either a high cut or high shelf band and set the parameters appropriately. In the below image we’ve set a high shelf at around 2 kHz with a cut of 6.5dB.
Reverb in the high end can add nice sparkle and air so we don’t necessarily want to totally filter it out here, and that’s why a high shelf can work very well.
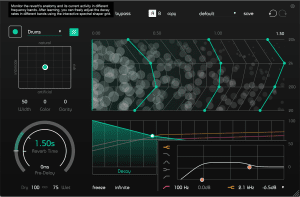
smart:reverb Pre-filter EQ with high shelf filter at around 2 kHz with a cut of 6.5dB
Equalizers on reverb channels don’t have to be stationary. Introducing automation is an interesting way to control the energy of a track over time.
Anyone who has spent time producing dance music will know that opening up a low-pass filter over a four-, eight- or sixteen-bar section is an effective way of building energy before a drop. This is often paired with a riser of some kind.
We can take these techniques and apply them to our reverb send to create even more energy in our builds.
This particular technique requires your reverb to be on a dedicated send. You will also need to place an EQ after your reverb. We’ll use sonible smart:EQ 3.
Set up your reverb channel and send all melodic elements with information in the upper mids and higher frequency range to the reverb bus. All we’re going to do is dial in a shallow low pass filter with smart:EQ 3, and starting with the cutoff at around 600Hz, automate it so it fully opens over the four-, eight- or sixteen-bar period you’re working with. This imitates a riser and also introduces more high end energy as the track builds towards a drop.
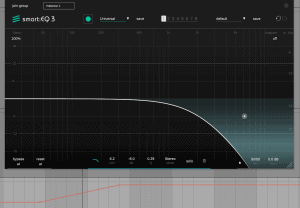
smart:EQ 3 with an automated low pass filter
We’ve discussed low and high end attenuation separately, but now let’s take a look at how they attenuate both ends of the spectrum simultaneously at one of the world’s most legendary music studios.

Abbey Road Studios in London
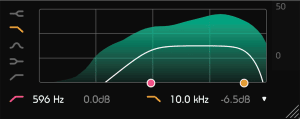
The Abbey Road Reverb trick is an EQ configuration designed to be placed before your reverb on your reverb send channel. It’s designed to allow your reverb to create a sense of space in your mix whilst also avoiding clashing with other elements and providing spectral room.
It’s very easy to do. Simply start by placing your reverb on a bus and placing your EQ before the reverb. Alternatively, if you’re using a reverb that has a built-in filter such as smart:reverb, then there’s no need to even load an EQ on that channel.
Dial in your reverb sound. Make sure that the reverb is set to 100% wet as it will be on your aux channel.
Time to EQ. Either with your reverb’s built in filter or your standalone EQ plugin, create a high pass and a low pass filter.
Set your high pass filter’s cutoff to 600 Hz and the cutoff of your low pass filter to 10 kHz.
The Abbey Road Trick in smart:reverb: Pre-filter EQ with high and lowpass filter
This should leave you with a nice lush reverb that doesn’t take up too much space in your mix.
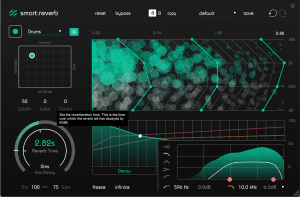
One powerful feature that is unique to smart:reverb is the decay modification options. smart:reverb lets you adjust several characteristics of the reverb as it decays – most interestingly for our purposes there is a dedicated spectral shaping unit which allows you to adjust how different areas of the frequency spectrum decay over time.
Spectral shaping isn’t able to fully filter out frequencies like an EQ can, however, if you are looking to alter the tonal character of your reverb tail it can add some beautiful texture.
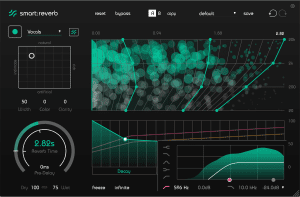
smart:reverb and it’s spectral shaping sections with altered reverb tail
In the above image we’ve sent our vocal track to the reverb and increased the decay of the highest frequencies in our reverb, giving ethereal air to our track. This is different to simply EQing our reverb as we haven’t altered the tonal balance of our initial reverb response – it’s a nice extra tonal tool to have up your sleeve.
That said, we can use a complimentary EQ in combination with the shaping of the spectral tail. Not only can we increase the decay of the higher frequencies in our reverb tail, we can also cut the gain of the bass frequencies with an EQ either before or after the reverb unit.
To discover more about spectral shaping, check out our article on spectral balance throughout the ages, which examines the tonal profile of music since the sixties for a visual insight into audio history.