Creating a beautiful space to accompany vocal recordings can be a daunting task, but today we’re going to show you how to do it effectively and with pleasure.
Note: We replaced smart:reverb with smart:reverb 2! This content-aware reverb plug-in understands single tracks and entire mixes, helping you create exactly the reverb environment you imagine.
If you’ve ever wondered why your vocal reverb doesn’t sound as thrilling as you’d expect, it usually has nothing to do with the vocal or the reverb itself – it’s in the elusive sense of what we perceive as organic to the source material – a well-fitting garment for a particular body, so to speak. But how should we assess this? Simple forms of ‘I like it’ or ‘I don’t like it’ might work, however, this won’t result in a reproducible pattern of thought. Let’s dive deep into this issue to the point where you have a clear perspective on where the problem is, why it is there and how to address it.
As an audio illustration, we’ll use a beautiful vocal recording by German artist CHIIARA from the song “Leicht”. For our task it is crucial to have high quality audio material, otherwise we would be in doubt as to whether the vocal is not attractive enough, or the added space, or both.
Let’s start in the usual way, listening to the dry vocal and adding smart:reverb with a Vocals profile and everything else on default values, except the Dry/Wet levels, because for convenience we’ll use the send/return scheme, which means Dry at 0 and Wet at 100 – this way we’ll be able to monitor the original and reverberant signals more efficiently.
Vocal Dry
Reverb Only
Vocal + Reverb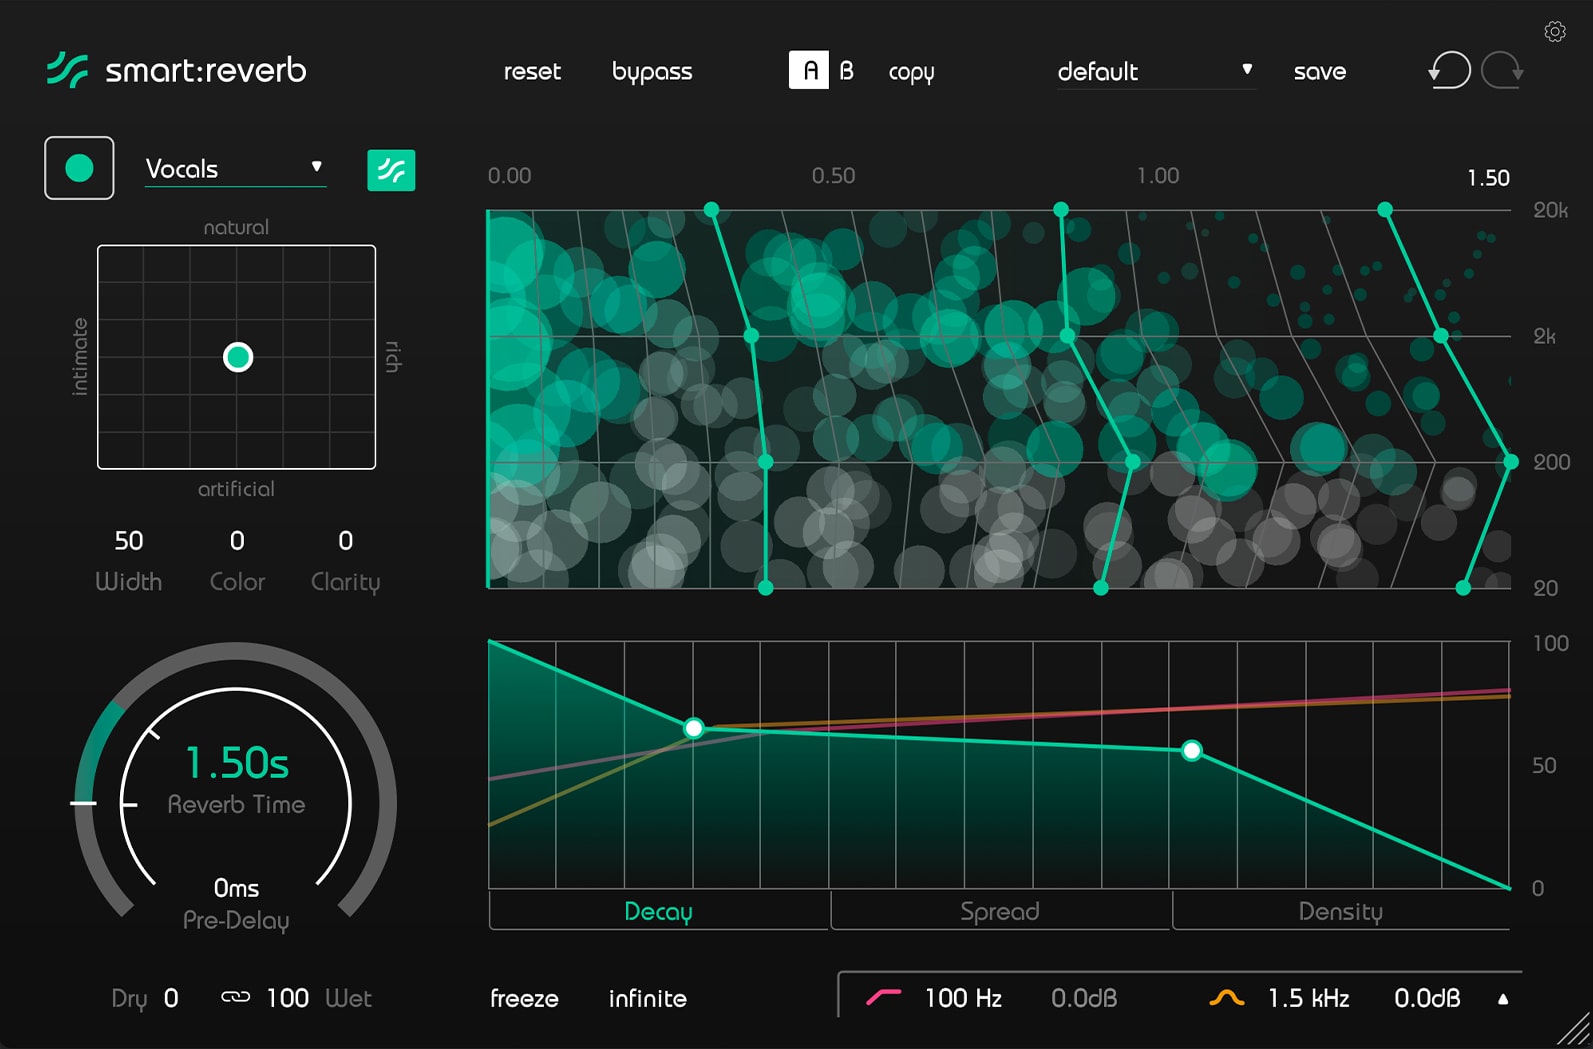 We can hear that the added reverb is generally fitting to the source material, but we can also hear some discrepancies: there’s a slight frequency clash between the vocal and the reverb, the perceived width of the room is too narrow, and the reverb tail ends quite abruptly. Moreover, we can sense that the reverb adds little value to the vocal sound, and we want the opposite result – to highlight the beauty of the vocal instead of covering it with reflections for no clear reason. Let’s fix this by adjusting some parameters in smart:reverb.
Reverb Only Tweak
Vocal + Reverb Tweak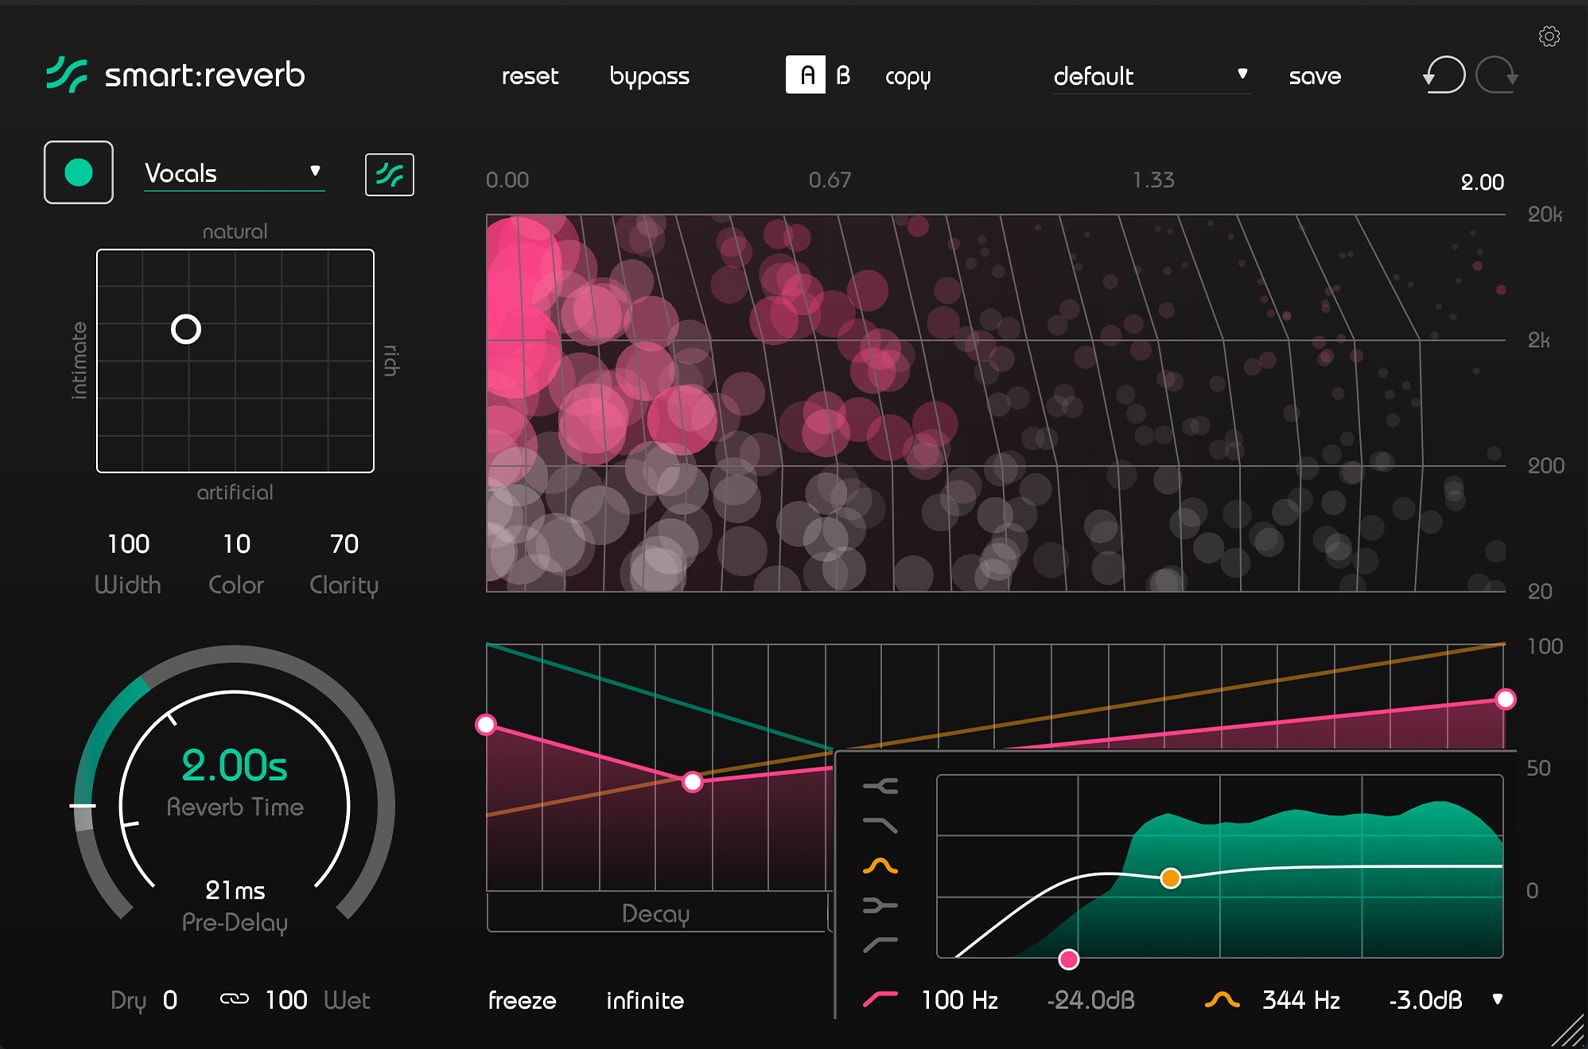 We’ve drastically changed the sound of the reverb, and you’ll notice that the separation between the vocal and the reverb is now much more distinct, and the spatial component fits the dry signal well enough. Why is the change so noticeable? Firstly, we’ve increased the Width to 100, which gave us a wider spatial distribution, and together with a slightly brighter Color and a considerable amount of Clarity, we’ve greatly reduced the frequency clash between the original and reverb signals. Secondly, we’ve used the Reverb Matrix to change the character of the reverb, increasing the reverb time and adding a bit of Pre-Delay to further spread and separate the reverb from the vocal. The final touch was tweaking the Decay, Spread and Density curves to polish what we’d already achieved. Adding a bit of EQ also helped, especially in the low midrange. But the main question is – are we happy with the sound now? Not yet. And why is that? It’s quite simple: we’re hearing the vocal with the room instead of the vocal in the room. It’s time to talk about something much more sophisticated, better sounding and more controllable – spatial vectors.
When we add reverb to audio sources, in most cases we’re relying on a device or plug-in to give us an overall impression of a room, a chamber, a hall, and so on. This “overall” thing is already the most sensitive and erratic part of this concept. We have no idea where our walls are, how each part of the room works and how we want to fill the room with audio energy. It may seem silly because we can change the size of the room and many other parameters as we have done before, but ask yourself – where is the back wall in this reverb? Where are the side walls? Where is the ceiling? Their presence is implied, but what they are and where they are is not entirely clear. Let’s start digging from that point.
We have a concept of “spatial vectors”. You can think of them as the walls of an imaginary room plus what’s inside the room – if it’s empty or there are some windows, furniture, cushions, fabrics, books etc. You want to have control over every little element of the room, because suddenly you’re not relying on an a-la-carte ‘overall’ reverb sound, but you’re starting this journey seriatim – one wall at a time, one object at a time. Let’s see how this works in practice.
Let’s start with a skeleton – we’re going to build the first front-to-back vector, which is the back wall of our future room. We can have a mono send for this, but we’ll create a stereo send instead in case we need to extend the vector further.
Reverb Back Wall
Vocal + Reverb Back Wall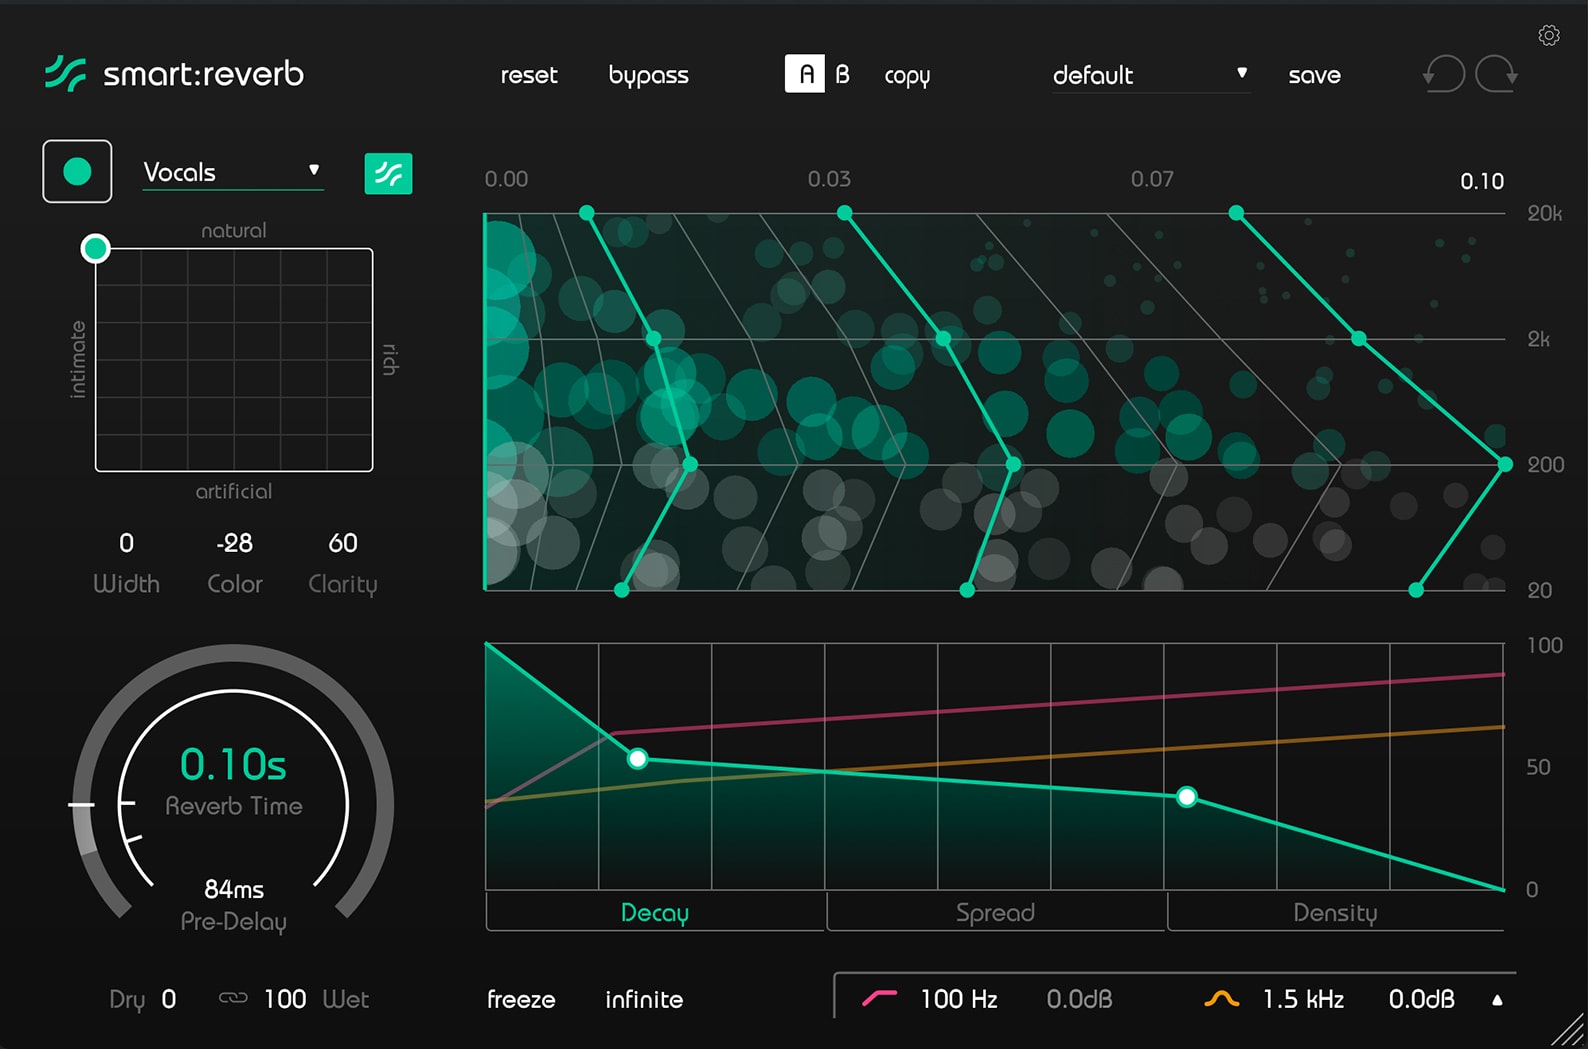 As you can see, we started with the Vocals profile, but after tweaking, we now have a mono reverb that sounds more like a slapback delay, due to the minimum reverb time, the 84ms Pre-Delay and its overall tone – darker and warmer compared to the original vocal. It feels like a reflection off a back wall, which is exactly what we’re looking for. But the sound is not there yet – we need to compress it and add some EQ to emphasize the separation between the original vocal and the newly created sound.
Reverb Back Wall + Comp + EQ
Vocal + Reverb Back Wall + Comp + EQ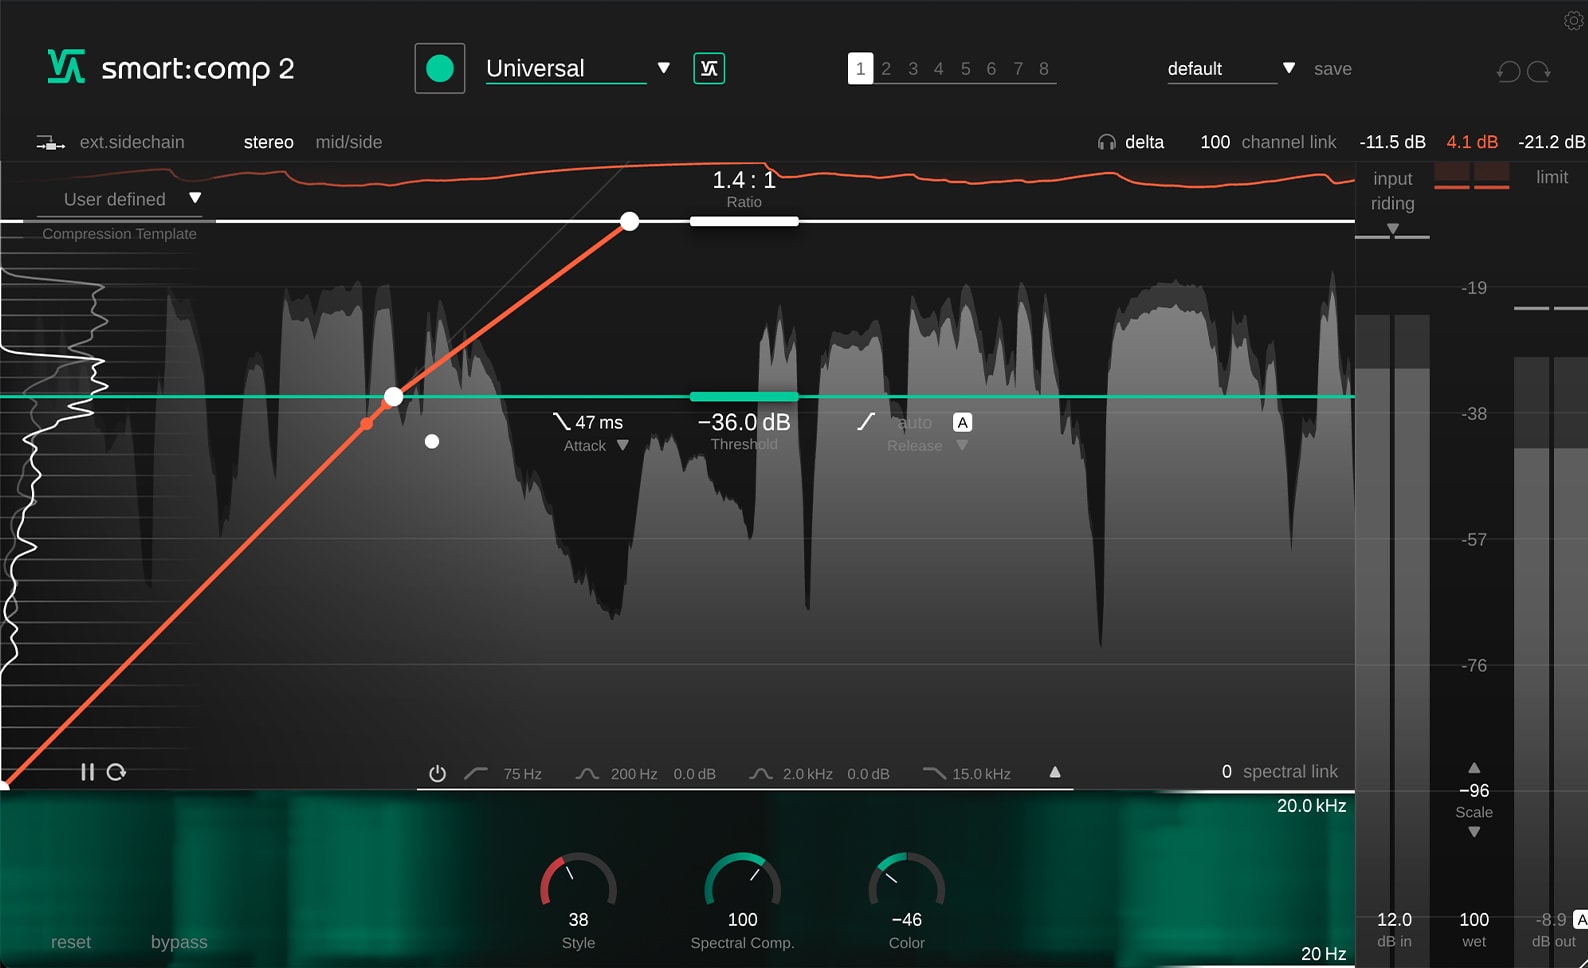 The difference in sound with compression and EQ isn’t drastic, but you can hear that with these additions we’ve managed to straighten out the tone of our front-to-back vector when it’s working with the original vocal. Adding a little saturation with the Style knob in smart:comp 2 could give the sound a bit more lift and fatness, which works like a charm in our case.
Now it’s time to add another vector – center-to-sides, i.e. the side walls of our future room.
Reverb Side Walls
Vocal + Reverb Side Walls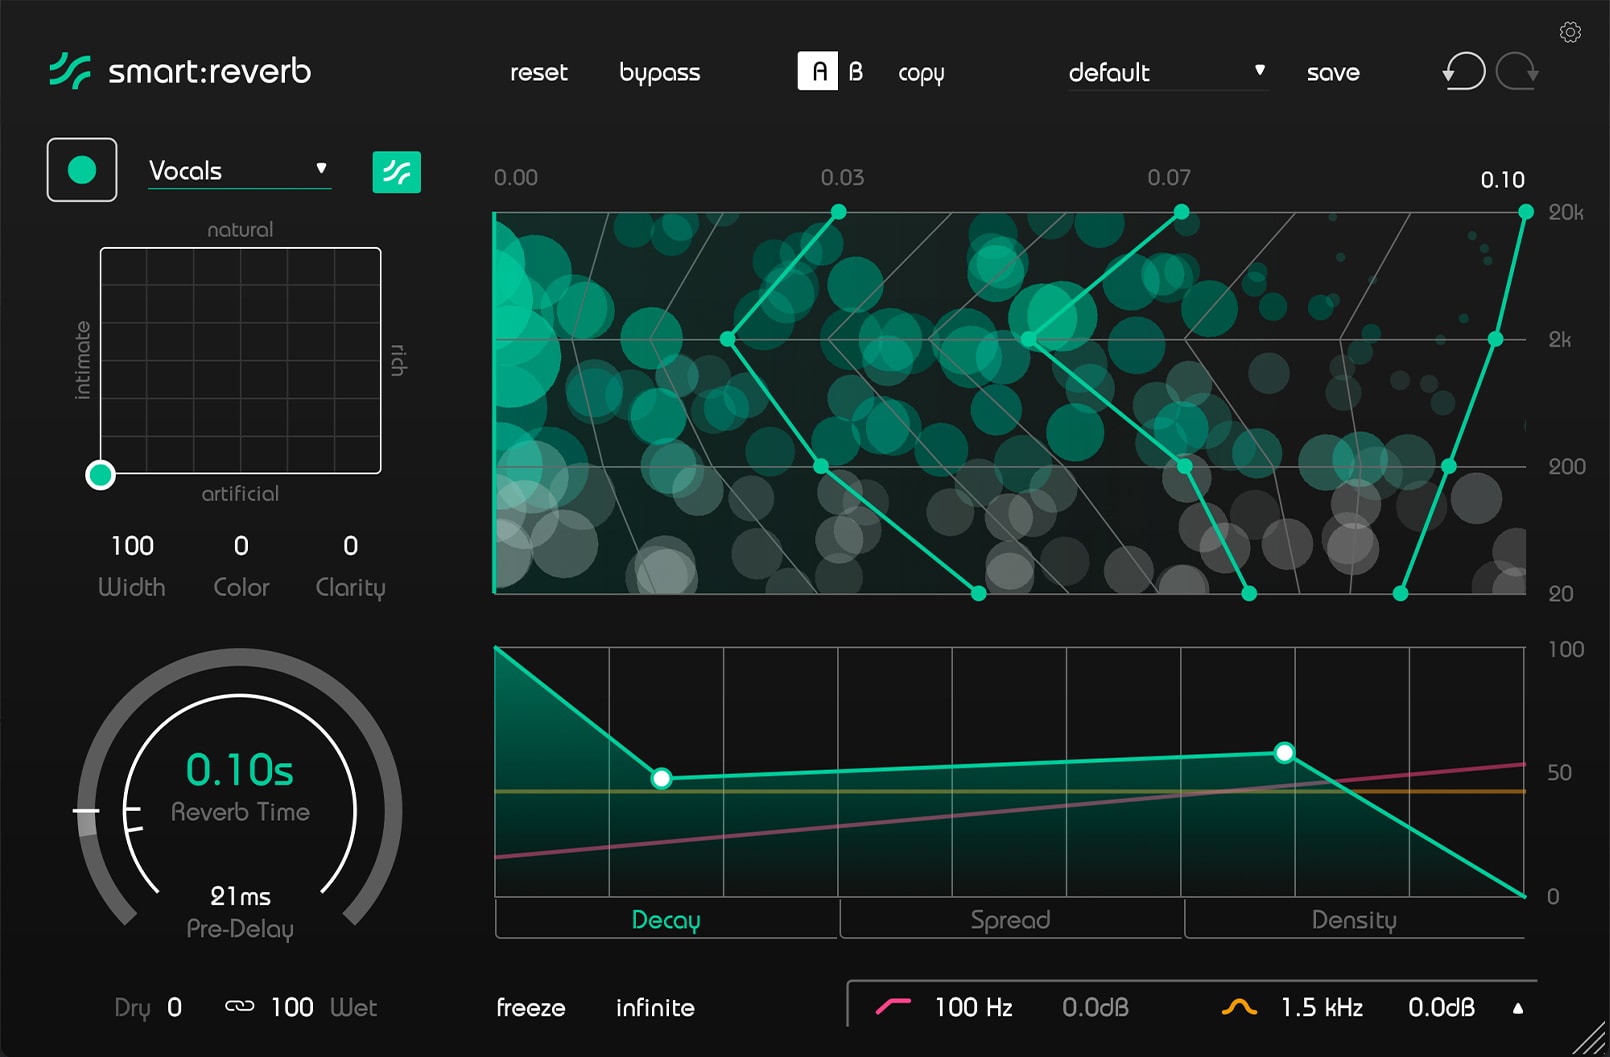 As before, we’ve started with the Vocals profile and, after adjusting the parameters, we now have a short but very wide sound, similar to a doubler. It gives our vocal side expansion and, in conjunction with the front-to-back vector, it gives boundaries to our future room. Note that in this case the Pre-Delay is 21ms, four times faster than the previous vector, because we want to create a rectangular space, not a square one. Pre-Delay is an extremely useful parameter when we’re trying to create a particular shape of the room. Let’s add some EQ to make the difference between the original vocal and the center-to-sides vector a little more distinct.
Reverb Side Walls + EQ
Vocal + Reverb Side Walls + EQ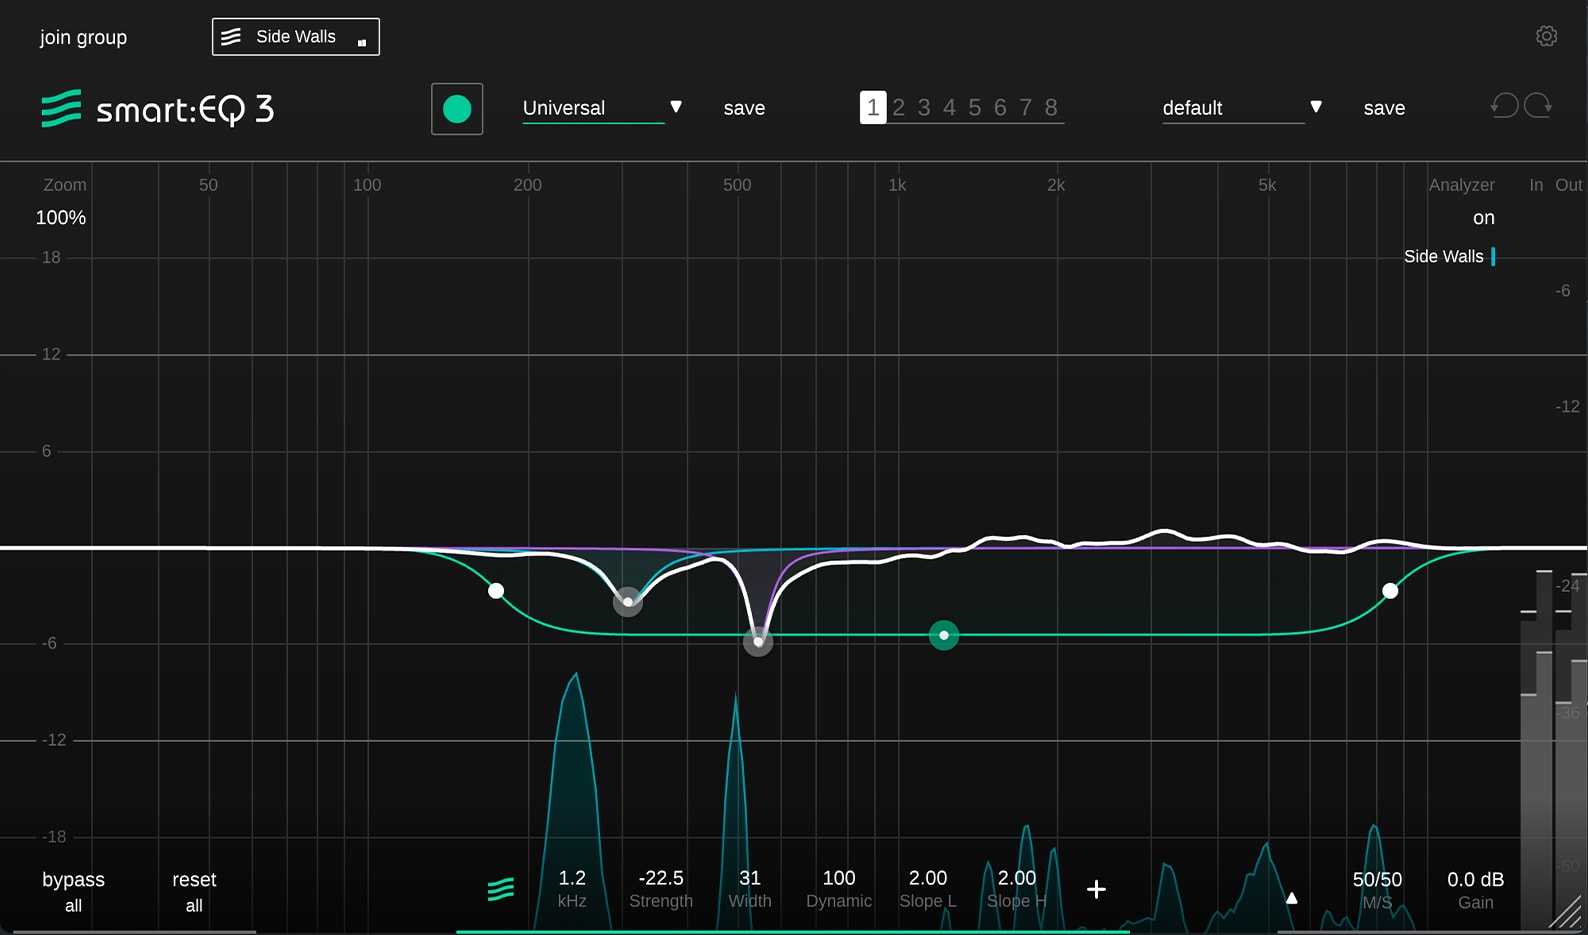 Inverting the smart filter of smart:EQ 3 is very useful in situations like this, where we want to dynamically enhance some peak frequencies rather than scooping them out. Because our center-to-sides distribution gives us control over the width of the sound, we can enhance this width with clever EQing decisions. One important note: don’t forget to scoop out any excess low mids, as the smart filter will bring them up as well. Let’s listen to the vocal with both vectors.
Reverb Back + Side Walls
Vocal + Reverb Back + Side Walls
You’re listening to the vocal with both sends set to nominal levels, so the room is a little too loud, but it’s very important to listen to the vectors in this way, because even if they’re very loud, they shouldn’t sound overpowering, and they should give you a clear idea of the size and shape of the room. Remember, we’ve only built a skeleton for our future room, but even now it’s organically connected to the vocal, and we’ve solved one of our initial problems of the vocal sounding with the room rather than in it.
Let’s move on and add some sinews and muscles to our skeleton – mid-directional filling.
Reverb Mid Filling
Vocal + Reverb Mid Filling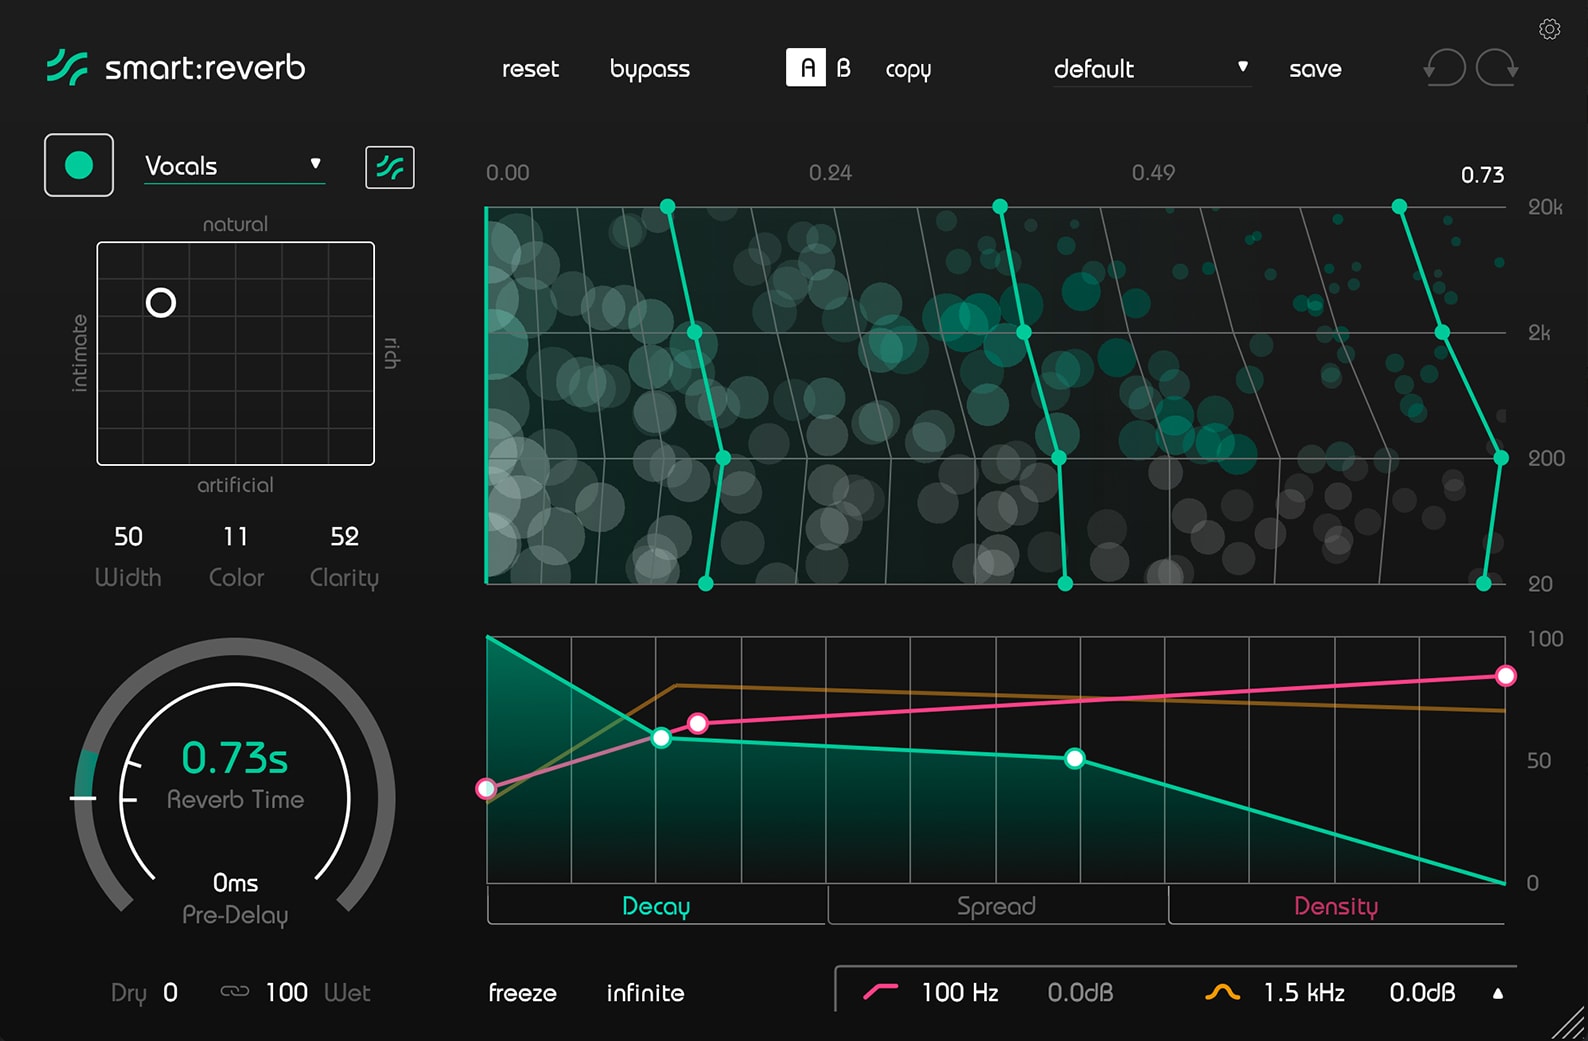 As before, we’ve started with the Vocals profile and changed the parameters according to our idea – to have a good filling for our future room. As you can see, there’s no Pre-Delay this time, but we’ve dialed in some Clarity to preserve the separation between the original vocal and the reverb. It feels like we need to add EQ to the reverb, as it might be useful to soften the high and mid frequencies, just as we add some furniture to the room.
Reverb Mid Filling + EQ
Vocal + Reverb Mid Filling + EQ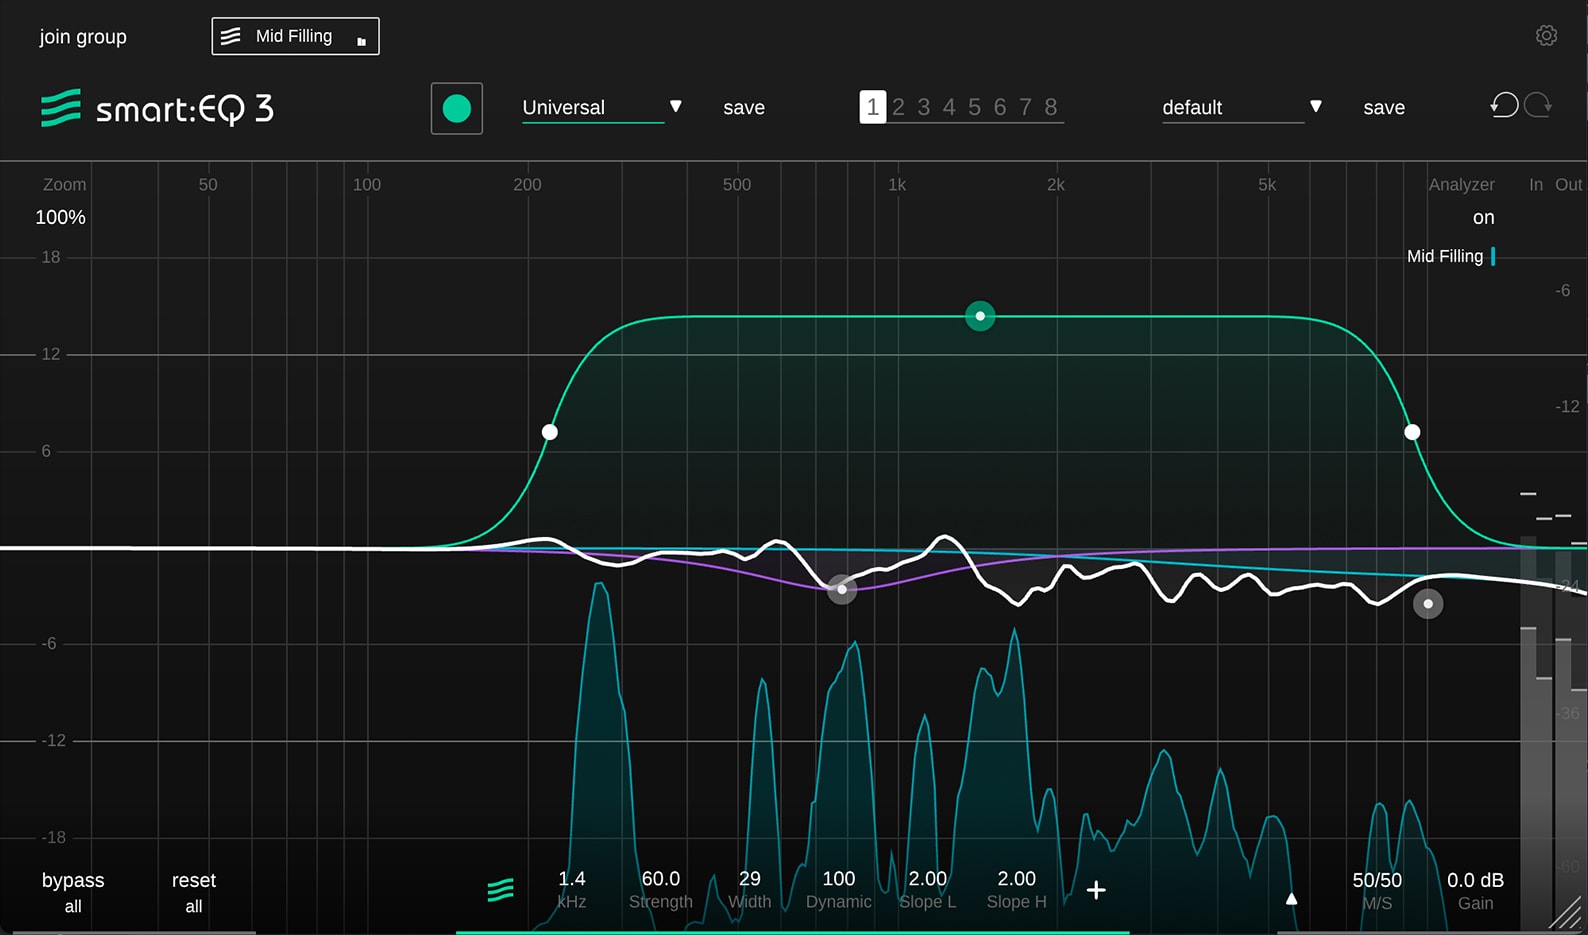 The smart filter helps us to limit the amplification of some of the more pronounced frequency peaks, and with the help of two additional conventional filters we’ve managed to create a smooth and controlled mid-directional filling for the space. Let’s listen to how this part of our room works with the previous two vectors.
Reverb Back and Side Walls + Mid Filling
Vocal + Reverb Back and Side Walls + Mid Filling
As you can hear, we’ve already constructed a natural and exciting space for the vocals, but there’s one important component missing – side-directional filling. Without it, the sound of the room is not yet complete.
Let’s add this last piece to our jigsaw puzzle.
Reverb Side Filling
Vocal + Reverb Side Filling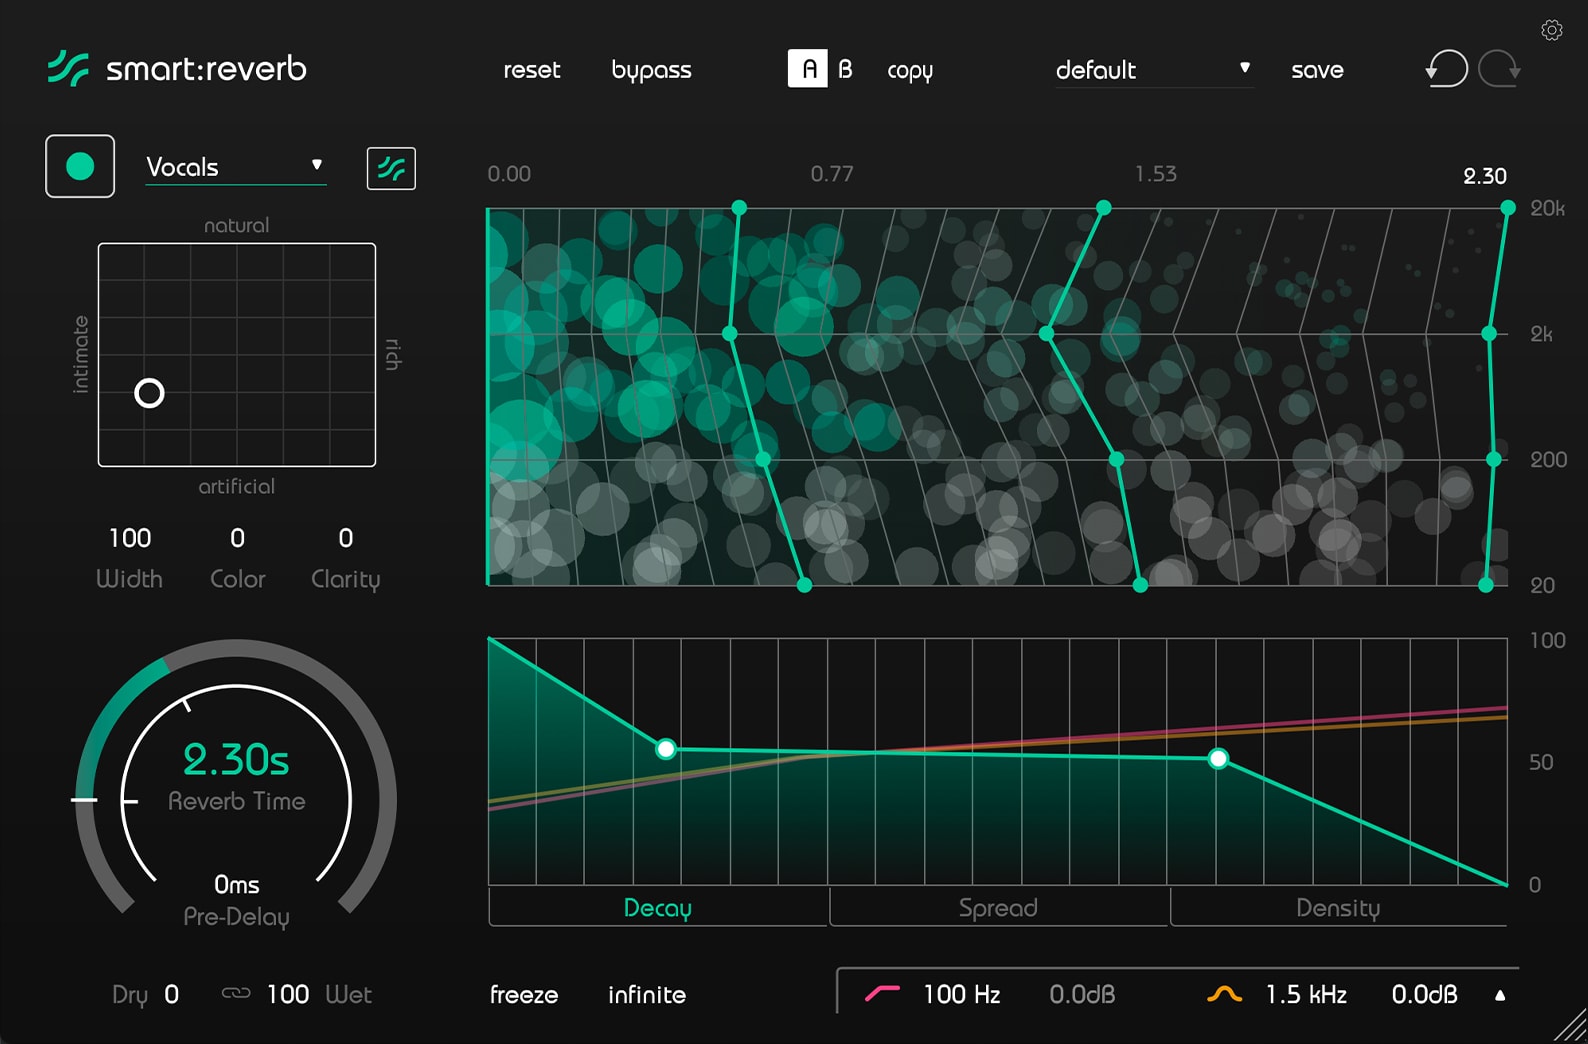 If you’ve listened carefully, you might have noticed that we have a big, long, rich reverb sound, almost as wide as possible, but at the same time it’s boomy, cloudy and clashes with the dry vocal. Of course, we could still use Clarity and Pre-Delay to fix this, but instead we’ll use the compressor in M/S mode with external sidechain control from the dry vocal. We’ll push hard on the mid part of the signal, leaving the sides almost untouched – this way we’ll reduce the muddiness without sacrificing the richness and fullness of our side filling. We’re also extending the reverb sound to the sides, which comes in handy in this scenario.
Reverb Side Filling + Comp
Vocal + Reverb Side Filling + Comp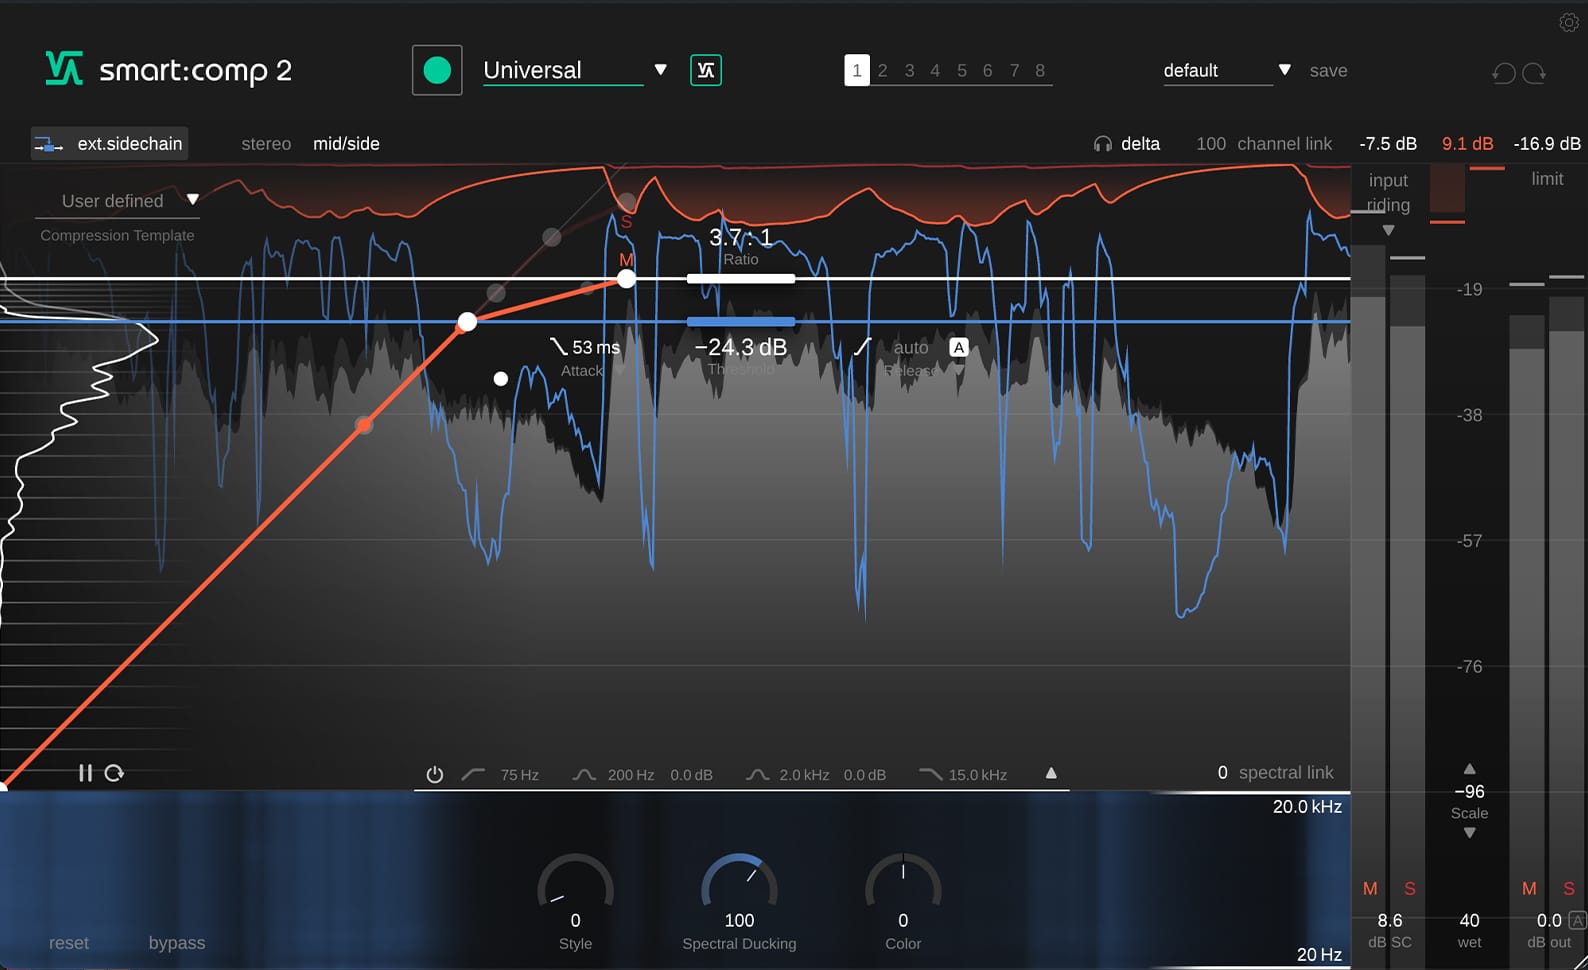 It’s very easy to hear how wide the reverb sound has become after applying sidechain compression to the mid part of the signal. We are reducing about 9 dB, which helps us to make a space for the dry vocal. Our side filling is still rich-sounding, but because we’ve managed not to add any Pre-Delay, this part of our future room stays within the boundaries we’ve already constructed with the front-to-back and center-to-sides vectors. Our “future room” has become a fully established entity now.
Reverb Back and Side Walls + Mid and Side Filling
Vocal + Reverb Back and Side Walls + Mid and Side Filling
Compared to what we started with, it’s a completely different story now: the vocal is inside the room – they work together, they interact, they complement each other and they give us a clear perspective on the emotions CHIIARA have woven into her song. Still, you may disagree and say that this or that element of the room is too loud or too quiet and that it sounds unpleasant, but that’s the beauty of having separate vectors and elements of the room – we can easily tweak them to our liking in order to engage with the song in the best possible way. We’ve moved some faders and now you can listen to how it all works in the context of the music.
Dry Vocal + Music
Vocal with Reverb + Music Using the vectorial approach to build space around audio signals might seem overly complicated, highly sophisticated or even abstruse if all you want to do is quickly add some reverb to a vocal or something else. However, the benefits of working with spatial processing in this way outweigh the time and mental effort involved, because at the end of the process you will have an exceptionally sounding room or rooms for your vocals, instruments and mixes. Today we’ve deconstructed the simplest example of this concept, but if you like you can extend it by introducing additional vectors – center-to-front-left, right-side-back-left and so on. Of course, in stereo we have far fewer possibilities to add vectors than in immersive formats where we have a full digital sphere or digital cube to play with, but even in stereo we can still incorporate a lot of clever ideas to please our ears. Let your vocals shine!
 This article is written by Oleg “Yorshoff” Yershov – a sound engineer, teacher, and video blogger from Ukraine, as well as the founder of the YORSHOFF MIX project. Oleg’s professional interests cover a wide range of topics related to sound – from recording, mixing, and mastering music and audio post-production to software development and the creation of thematic educational materials such as articles, books, manuals, and videos.